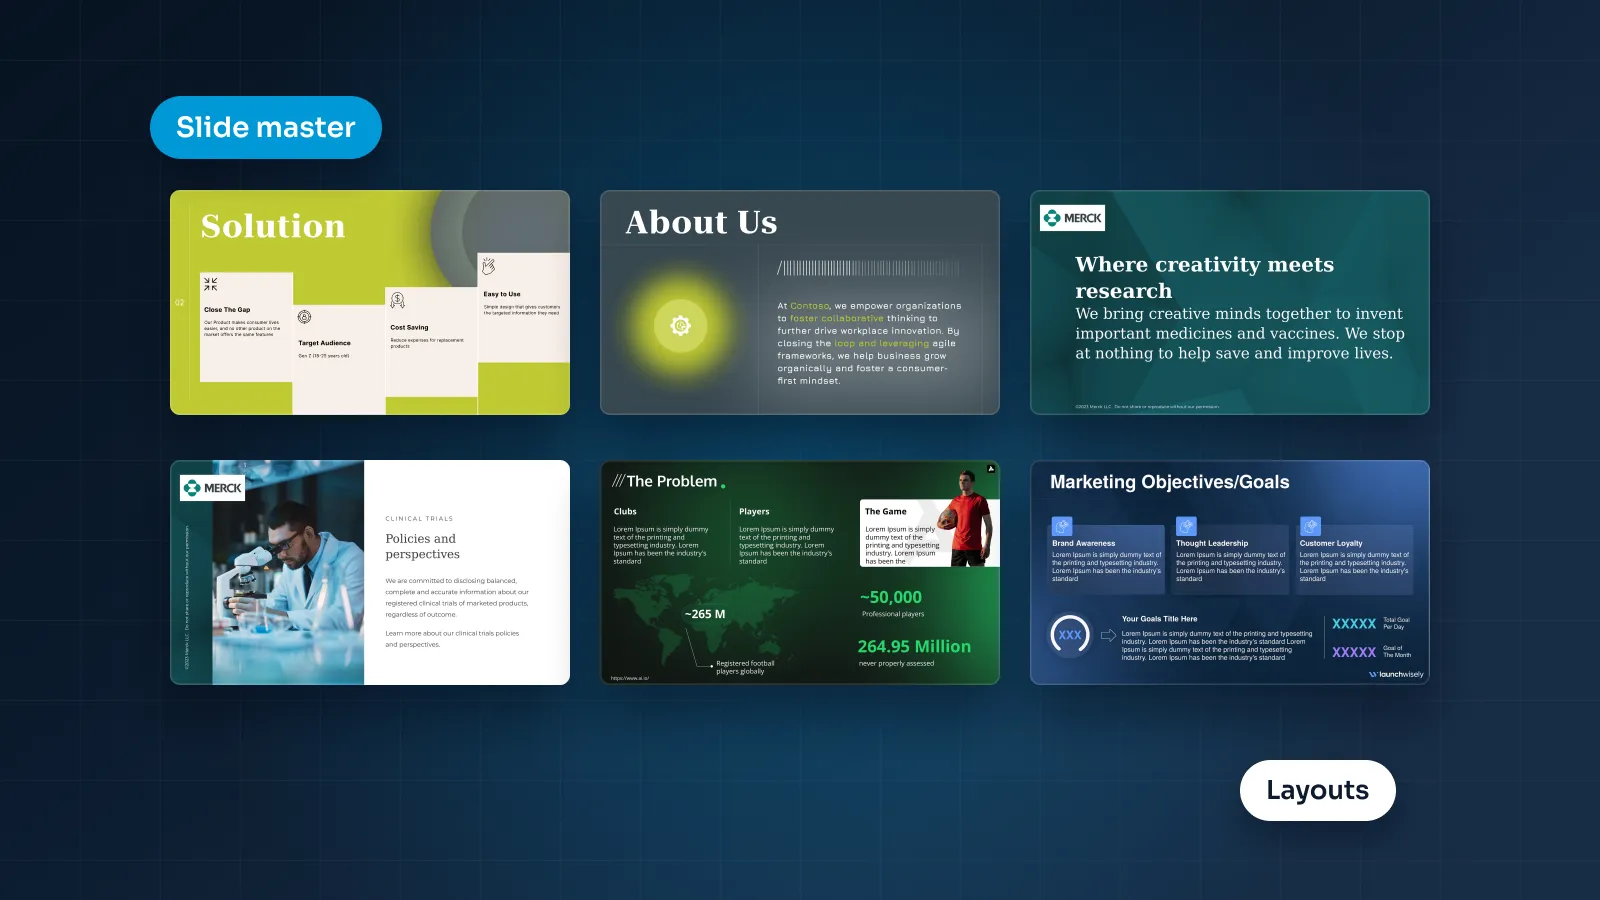

Most people meet the slide master by accident. There's a logo they can't click, a font that keeps coming back, a slide that refuses to line up with the others. That's the master doing its job. It just wasn't set up on purpose.
This guide explains what the slide master is, how the master, layouts and slides relate to each other, why placeholders matter more than anything else in the file, how to set up a master step by step and how to fix the problems that show up in real decks. It ends with the Google Slides equivalent, the Theme builder. If you're planning a full brand template, our guide to custom PowerPoint templates covers the whole project; this post is the hands-on part.
What the slide master is
Open View > Slide Master and PowerPoint switches to Slide Master view. In the thumbnail pane on the left, the larger slide at the top is the slide master. The smaller slides beneath it are its layouts. Close Master View, on the same tab, takes you back to Normal view, where you work on slides.
The master holds the rules every slide shares:
The background, whether plain, tinted or an image
Theme colors and fonts, which every placeholder, chart and table picks up
Text styles: the size, weight and spacing of titles and each level of body text
The position of the title and body text, inherited by every layout
Fixed elements such as the logo, footer and slide number
The master belongs to a theme. A theme is a set of colors, fonts and effects, and each theme comes with a slide master and its layouts. If a file uses several themes, it has several slide masters, which is the root of more than one problem later in this post.
Why bother? Because without a master, consistency depends on memory. Forty slides, four authors and one late night later, titles sit in four slightly different places. With a master, the rules live in the file, and a change made once reaches every slide that follows them. The broader design rules a master should hold, such as margins, type sizes and a small palette, are in our guide to making a PowerPoint look professional.
Master, layouts and slides
Think of it as three levels, each inheriting from the one above.
| Level | What it controls | Where you edit it | Example |
|---|---|---|---|
| Slide master | What every slide shares | Slide Master view, top thumbnail | Background, theme fonts, logo |
| Layout | One kind of slide | Slide Master view, thumbnails beneath | "Chart with takeaway": title, chart and source placeholders |
| Slide | The content | Normal view | The Q3 revenue chart and its title |
A change to the master applies to every layout. Most day-to-day edits, though, are made to individual layouts, because each kind of slide needs its own arrangement. A section divider and a chart slide share a font and a logo, but not much else.
Slides then use a layout. When you add a slide with New Slide, you pick its layout. To switch a slide to a different layout in Normal view, use Home > Layout.
A simple rule decides where things go:
On the master: only what every single layout needs, such as the theme fonts, the text styles and usually the logo.
On a layout: what one kind of slide needs, such as a full-width photo area on the title layout or a source line on the chart layout.
On the slide: only the content.
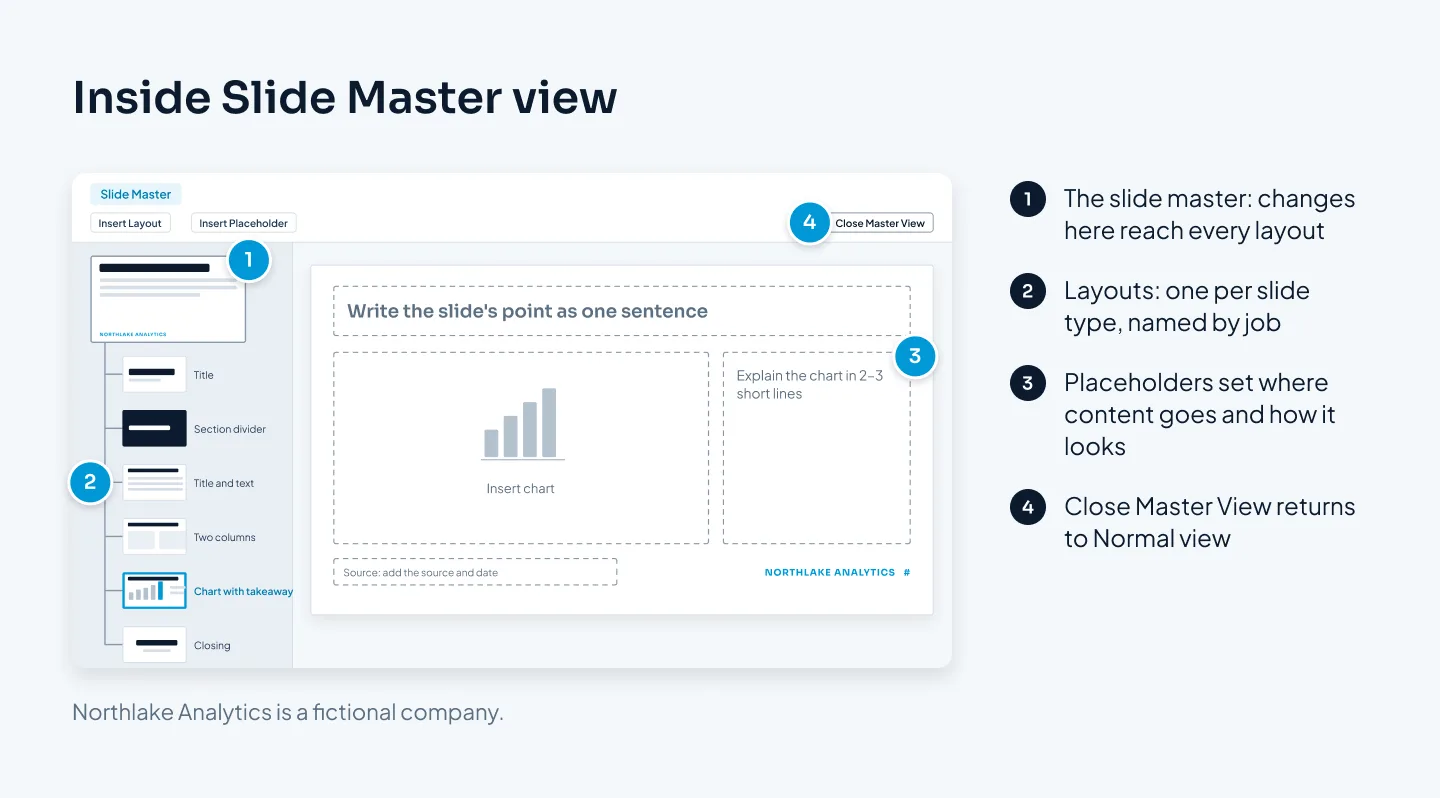
Items placed on the master or a layout can't be selected or moved by accident in Normal view. That's why the logo won't budge when you click it. It's a feature: nobody can nudge, resize or delete it while editing slides.
Placeholders: why they matter
A placeholder is a box that belongs to a layout. It reserves a spot for a title, text, a picture, a chart, a table or other content, and it carries the layout's position, size, font and color. Whatever you type or insert takes on all of that.
A text box is different. It's drawn on one slide and knows nothing about the layout. It looks the same as a placeholder until something changes, and then it gets left behind.
Placeholders matter for four reasons:
New slides start right. Pick a layout and type. Nobody measures margins or matches fonts by eye.
Changes spread. Change the title style on the master, and every title in a title placeholder follows. Titles typed into text boxes don't.
Mistakes can be undone. If someone drags a placeholder out of place, Home > Reset puts the slide's placeholders back the way the layout set them.
Accessibility improves. Built-in layouts and placeholders help screen readers, because their reading order is set. Every slide also needs a unique title, and PowerPoint's Accessibility Checker (Review > Check Accessibility) flags slides with missing or duplicate titles.
A slide master is only as good as its placeholders. Everything else is decoration that happens to repeat.
Placeholders also carry prompt text, the gray wording you see before anything is typed. In Slide Master view you can replace it with an instruction, such as "Write the slide's point as one sentence" in a title placeholder or "Source: add the source and date" on a chart layout. It's the cheapest training your team will ever get.
Set up a master, step by step
The order matters. Edit the master before you build slides: if you change layouts later, slides that already exist may need their layout reapplied. Set up in this order and you'll rarely redo anything.
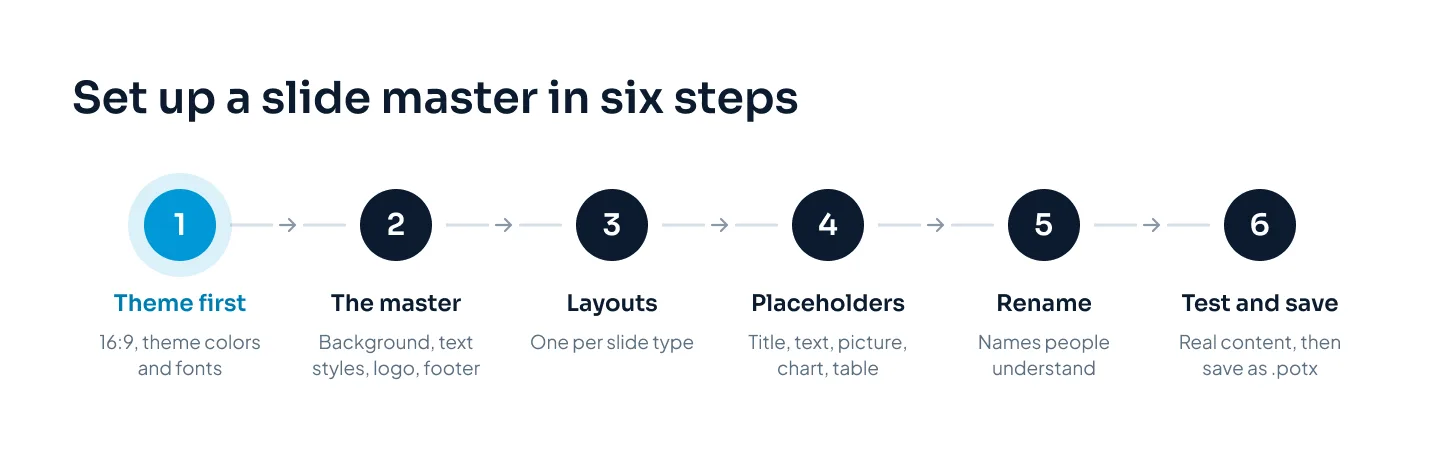
1. Theme first: slide size, colors and fonts
Start with the slide size. 16:9 (1920 × 1080 px) is the standard today, and 4:3 is a legacy format. Set it before you design anything, because changing it later rescales every slide.
Then set the theme colors. In Slide Master view, go to Colors > Customize Colors. PowerPoint's theme has 12 color slots: two dark and two light colors for text and backgrounds, six accents, a hyperlink color and a followed-hyperlink color. Enter your brand colors by hex value under More Colors > Custom. Charts, tables and SmartArt pull from these slots, and chart series use the accents in order, so put your main brand color in Accent 1 and the one "look here" accent in a later slot. Our guide to presentation color schemes covers how to choose the palette.
Next, the theme fonts: one for headings and one for body text. Pick fonts that will be on every computer that opens the deck, or plan how you'll handle them. Our guide to the best fonts for presentations sorts fonts by where they work.
2. The master
Select the top thumbnail and set what every slide shares: the background, the title style, the body text styles for each level, the logo, the footer and the slide number. Mark your margins and grid with guides while you're here.
Keep the master lean. Anything on it appears everywhere, so a decorative band that suits content slides will also sit on your full-bleed photo slides.
3. Layouts by slide type
List the kinds of slides your decks actually repeat. Look at a few recent decks rather than guessing. A typical business list:
Title
Section divider
Title and text
Two columns
Big number
Chart with takeaway
Image and text
Table
Team
Closing
Insert a new layout for each one in Slide Master view, or adapt a built-in layout that's close. A short list of distinct layouts beats thirty that nobody can tell apart.
4. Placeholders on every layout
Use Insert Placeholder to add the boxes each layout needs: title, text, picture, chart, table and more. Snap them to your guides, set the text sizes and replace the prompt text with instructions. Every content area should be a placeholder. If a layout has a loose text box where people will type, it will break the first time someone uses it.
5. Rename every layout
In Slide Master view, you can rename any layout. Name each one for its job: "Chart with takeaway" or "Team, four photos", not "Custom Layout" or "Title and Content 2". These names are what people see when they click New Slide, so they decide whether the right layout gets picked.
6. Test with real content, then save
Close Master View and use the file the way your team will. Add a slide from every layout and fill it with real text and real photos. Paste a paragraph from an email. Insert a chart and change its data. Drag a placeholder out of place and use Home > Reset. Run the Accessibility Checker. If your team uses both Windows and Mac, open the file on both.
Then save it as a PowerPoint template (.potx). Opening a .potx creates a new untitled presentation, so the original template stays clean however many decks are made from it.
Fix common slide master problems
Most slide master problems come from one of two causes: slides that arrived from another file, or content that was formatted by hand instead of through the master.
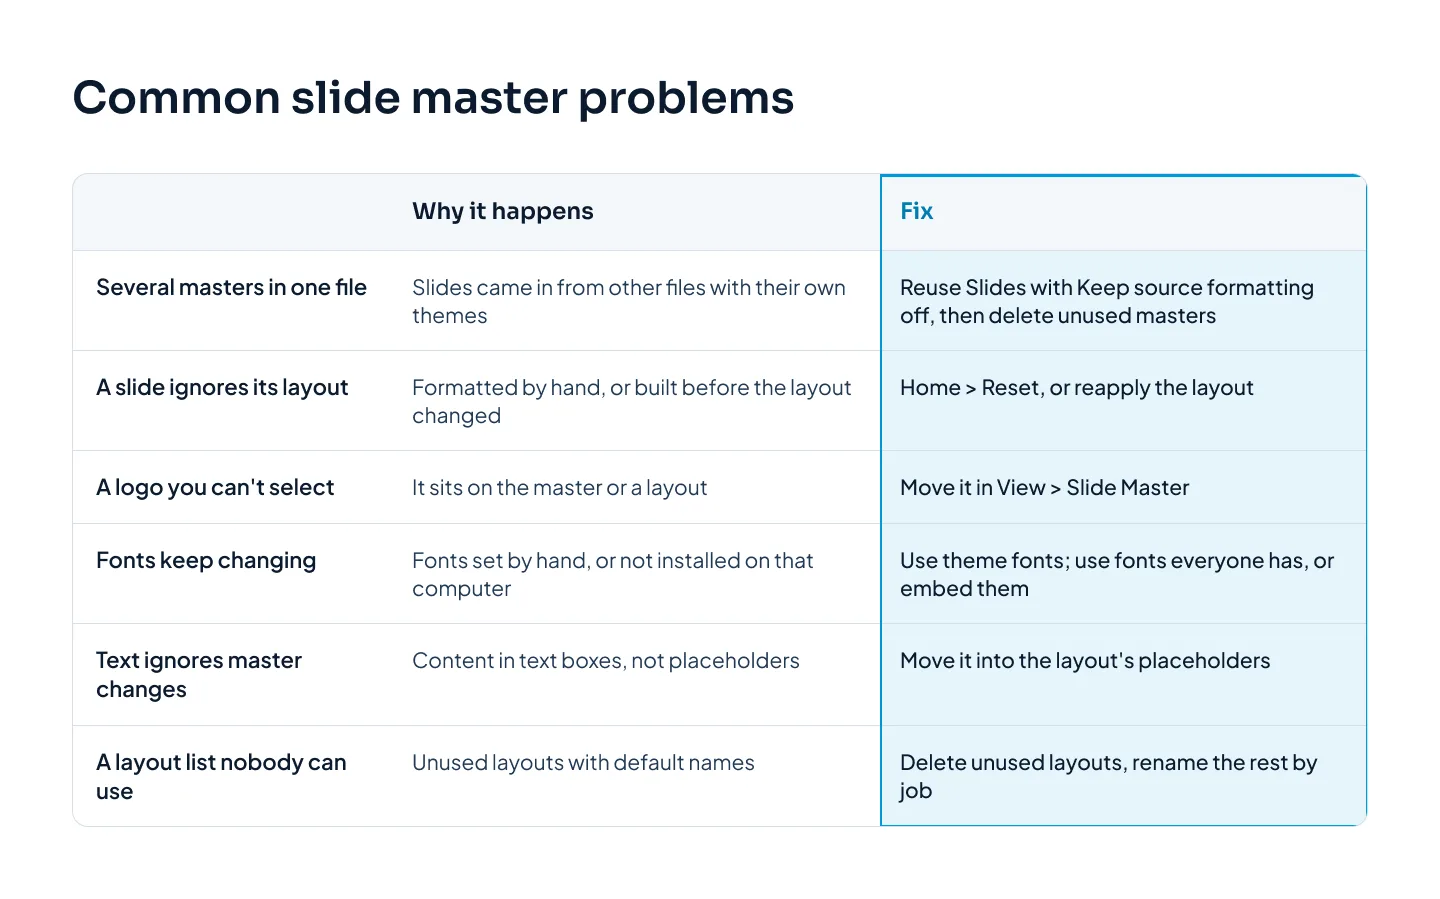
Several masters in one file
Open Slide Master view and scroll. If you find two, three or ten masters, each with its own layouts, slides have come in from other files with their original formatting kept. They brought their themes, and each theme brought a slide master.
To fix it, bring the content in again on your own theme. In PowerPoint, Home > New Slide > Reuse Slides inserts slides from another file; with "Keep source formatting" off, the inserted slides take on the current deck's theme. For slides already in the deck, apply one of your own layouts with Home > Layout. Once no slide uses an extra master, delete it in Slide Master view.
A slide that ignores its layout
You fix a layout, and one slide doesn't change. Either the slide was formatted by hand (moved, resized or restyled), or it was built before the layout changed. Select it and use Home > Reset, or reapply the layout from Home > Layout.
A logo you can't select or move
The logo sits on the master or a layout, so it can't be selected in Normal view. Go to View > Slide Master, find the master or layout that holds it and move it there. If one kind of slide shouldn't show the logo, take it off that layout or build a layout without it. Don't paste a second logo on top.
Fonts that keep changing
Two different problems look the same. If some text doesn't change when you change the theme fonts, it was given a font by hand instead of using the theme fonts; select the slide and use Home > Reset so it follows the layout again. If fonts change on another computer, the font isn't installed there, so PowerPoint substitutes another font and line breaks and spacing move.
For the second, use fonts every viewer has, or embed them. On Windows, File > Options > Save > "Embed fonts in the file" does it, and current PowerPoint for Mac also supports embedding. Some font licenses don't allow embedding, and some fonts can't be embedded, so test the file on a computer without the font.
Text that doesn't follow the design
If a title change on the master skips some slides, their content is in text boxes, not placeholders. Move the text into the placeholders of the right layout and delete the boxes. It's slow on a long deck, but it's the only fix that lasts. Slides whose title sits in a text box can also be flagged by the Accessibility Checker as missing a title.
A layout list nobody can use
Thirty layouts called "Custom Layout" mean people pick at random. Delete the layouts no slide uses, rename the rest by job and keep the order logical, starting with the title layout and ending with the closing layout.
Google Slides: the Theme builder
Google Slides has the same idea under a different name. View > Theme builder opens it; it used to be called Master. The first thumbnail is the theme, which works like PowerPoint's slide master, and the layouts sit beneath it.
The equivalents:
| Task | PowerPoint | Google Slides |
|---|---|---|
| Open the master | View > Slide Master | View > Theme builder |
| Rename a layout | In Slide Master view | Right-click the layout > Rename |
| Duplicate a layout | In Slide Master view | Right-click the layout > Duplicate |
| Apply a layout | Home > Layout | Layout button, or right-click a slide > Apply layout |
| Theme colors | Colors > Customize Colors | Slide > Edit theme > Colors |
Two differences matter in practice. Google Slides uses Google Fonts only, so choose your theme fonts from its font menu (More fonts adds others). And you can import a theme from another Google Slides or PowerPoint file through Slide > Change theme > Import theme; if the PowerPoint theme uses fonts that aren't Google Fonts, they can be replaced, so check every layout afterwards.
Our guide to Google Slides design covers setting up a theme in detail, and our post on converting PowerPoint to Google Slides explains what else changes when a deck moves between the two.
When to have it built for you
Setting up a master yourself makes sense for one person's decks or a small team with simple needs. It's worth having it built when:
Many people make decks every week, and the brand has to hold across all of them
Your current file has several masters, and nobody trusts the layouts
You need layouts that are hard to build well, such as chart, team and image layouts that survive real content
Sales or marketing want a library of approved slides on one template, as in our guide to building a sales slide library
Our PowerPoint template design service builds exactly this. Every template includes a slide master with layouts, theme colors and fonts, chart and table styles, an icon set, example slides and a short user guide, and the list of layouts is agreed in the brief. At Pixel Presentation, templates start at $150, depending on the number of layouts and libraries, and take 5–7 working days. The pricing estimator shows your exact price.
For an example, the Merck template system is a PowerPoint template system for patient and clinical-trial content, with calm editorial type and layouts built on placeholders.