A deck is built to be clicked through by someone who knows what comes next. A video plays on its own, on a screen you don't control, often to people who arrived halfway through. The export takes a few clicks. Making the deck work as a video takes some design.
This guide covers both: when a video is the better format, how to export one from PowerPoint on Windows and Mac, how to set timings and record narration, and how to design slides and motion that hold up without a presenter. For the basics of animation itself, start with our guide to PowerPoint animation and Morph.
When a video beats a live deck
A video is the right format when nobody will be there to present, or when you can't control the computer it plays on.
Trade-show stands and lobby screens. A short loop that runs all day with no sound and no presenter.
Social clips. A few animated slides that explain one idea, posted where people scroll.
Sales follow-ups. A recorded walkthrough of the deck you presented, so the buyer can share it with colleagues who weren't in the meeting.
Recorded training. Lessons people watch at their own pace. Our guide to training presentations covers how to structure them.
Event openers and walk-in loops. A video plays the same on the venue's computer as on yours. Our guide to conference presentation slides covers the handover to the AV team.
Launch teasers. A short animated preview before or after a launch event. See our guide to product launch presentations.
A video also travels well. It plays without PowerPoint, and the fonts are drawn by the computer that exports it, so nothing gets substituted on the viewer's side.
The trade-off is control. A video runs on timings, so you can't pause on a slide when someone asks a question, skip a section or jump to a backup slide. For a live talk, present the deck. For a live webinar, share the deck too, and keep video for short clips within it; our guide to webinar slides covers screen sharing.
If you want the deck to open straight into a slideshow but still respond to clicks, save it as a PowerPoint Show (.ppsx) instead. It opens directly in Slide Show, but it isn't a video: it needs PowerPoint, or a viewer, to play.
How to export a video from PowerPoint
The export itself is the last step. Timings and animations come first, because the video plays exactly what you set up.
On Windows
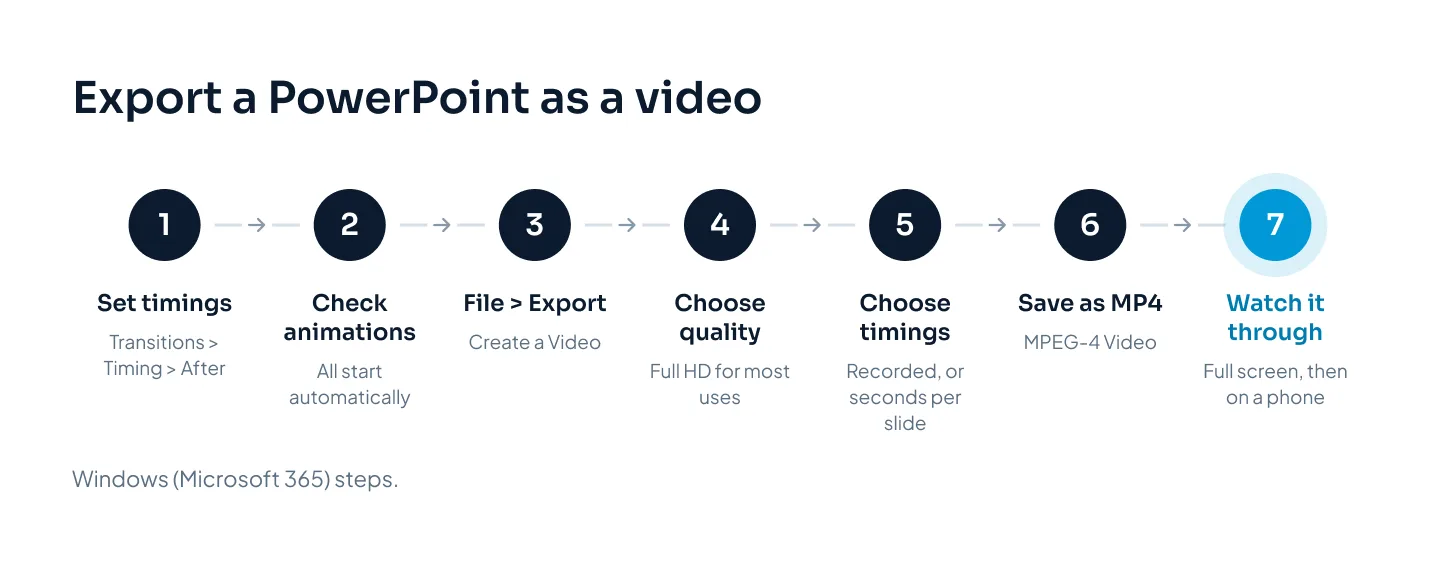
In Microsoft 365 on Windows:
Go to File > Export > Create a Video. (The Record tab also has an export option for recorded presentations.)
Choose a quality: Ultra HD (4K), Full HD (1080p), HD (720p) or Standard (480p).
Choose "Use Recorded Timings and Narrations" or "Don't Use Recorded Timings and Narrations". Without recordings, each slide shows for a set number of seconds, 5 by default, which you can change in "Seconds spent on each slide".
Click Create Video, and choose MPEG-4 Video, which gives the best compatibility, or Windows Media Video.
Wait. Long or complex decks can take a long time to export, and you can keep working in PowerPoint while it renders.
On Windows, the video includes animations, transitions, embedded video, narration and laser pointer movements. It doesn't include linked media, macros or ActiveX controls. So if a slide plays a video or sound file that is linked rather than embedded, it will be missing from the export.
On a Mac
In PowerPoint for Mac, go to File > Export, then choose MP4 or MOV as the file format and pick a quality.
One caution matters for animated decks. Microsoft's Mac help notes that some transitions look different in the exported video and that animation effects may not play. If your deck relies on animation, export the video on a Windows computer if you can. If you can't, watch the Mac export through carefully before you send it.
Choose the quality
Full HD (1080p) is the setting Microsoft recommends for most uses, and it matches a standard 16:9 slide at 1920 × 1080 exactly. Go higher only when the video will play on a very large screen. Go lower when file size matters more than sharpness.
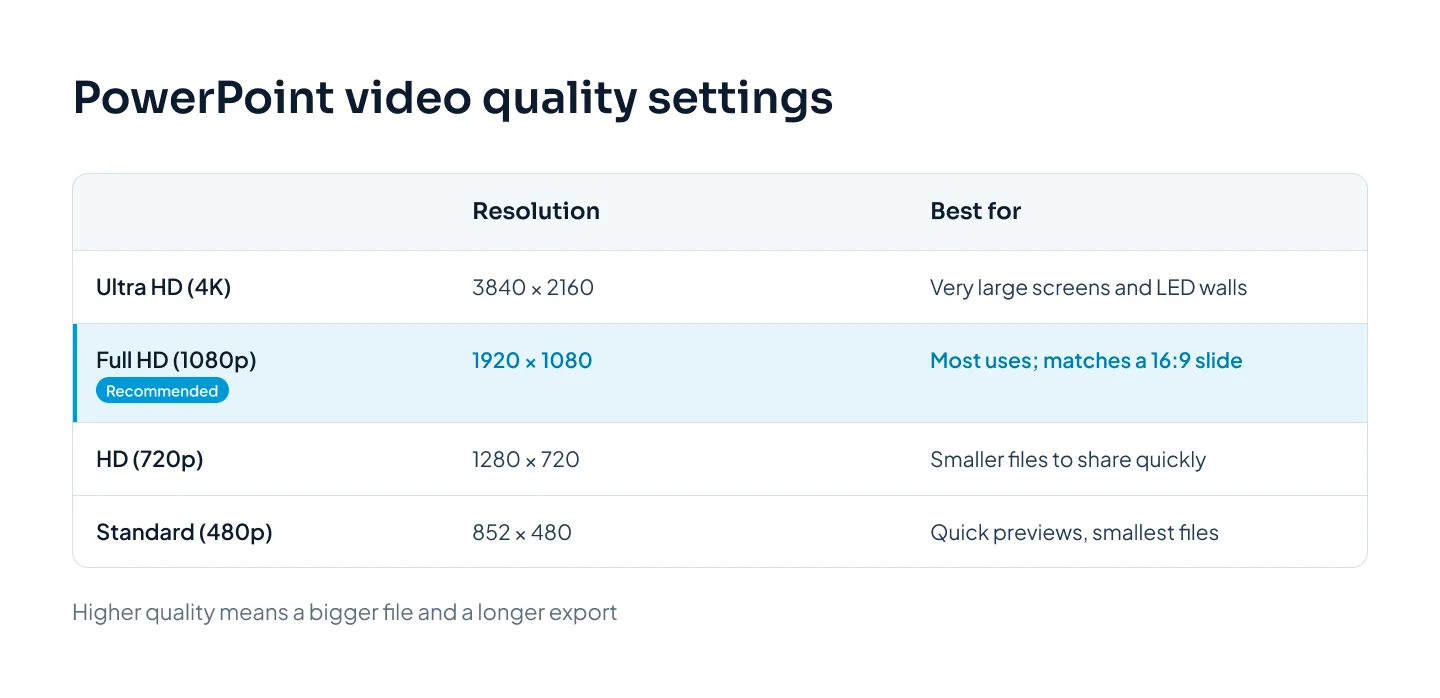
Higher quality means a bigger file and, on a long deck, a longer export. Export a short test at the quality you plan to use, and check it on the screen it will play on.
Timings: how long each slide stays
Timing is what turns a deck into a video. Without recorded timings, every slide gets the same number of seconds, 5 by default. That's fine for a quick test and rarely right for the final video: a title slide needs less, a chart needs more.
Set each slide's time on the Transitions tab, under Timing: tick After and enter the number of seconds. The slide advances on its own once that time is up.
To choose the number, we use a simple method rather than a formula:
Read the slide aloud at a calm pace. Everything on it, including labels.
Add a beat for the eye. A second or two for people to find where to look.
Add the animation time. If items build in one by one, the slide needs long enough for every build to finish and for the last item to be read.
Then watch it as a viewer would, without reading along in your head. If you find yourself waiting, shorten the slide. If a line disappears before you finish it, lengthen it or cut words.
Timing a loop
For a stand or a lobby screen, plan the loop as a storyboard with a time on every slide, and make sure the times add up to the length you want. Keep it short. Anyone who walks up mid-loop shouldn't have to wait long for the start.
Here's a 30-second loop for Calder Robotics, a fictional maker of robotic picking and assembly cells, built for a trade-show stand:
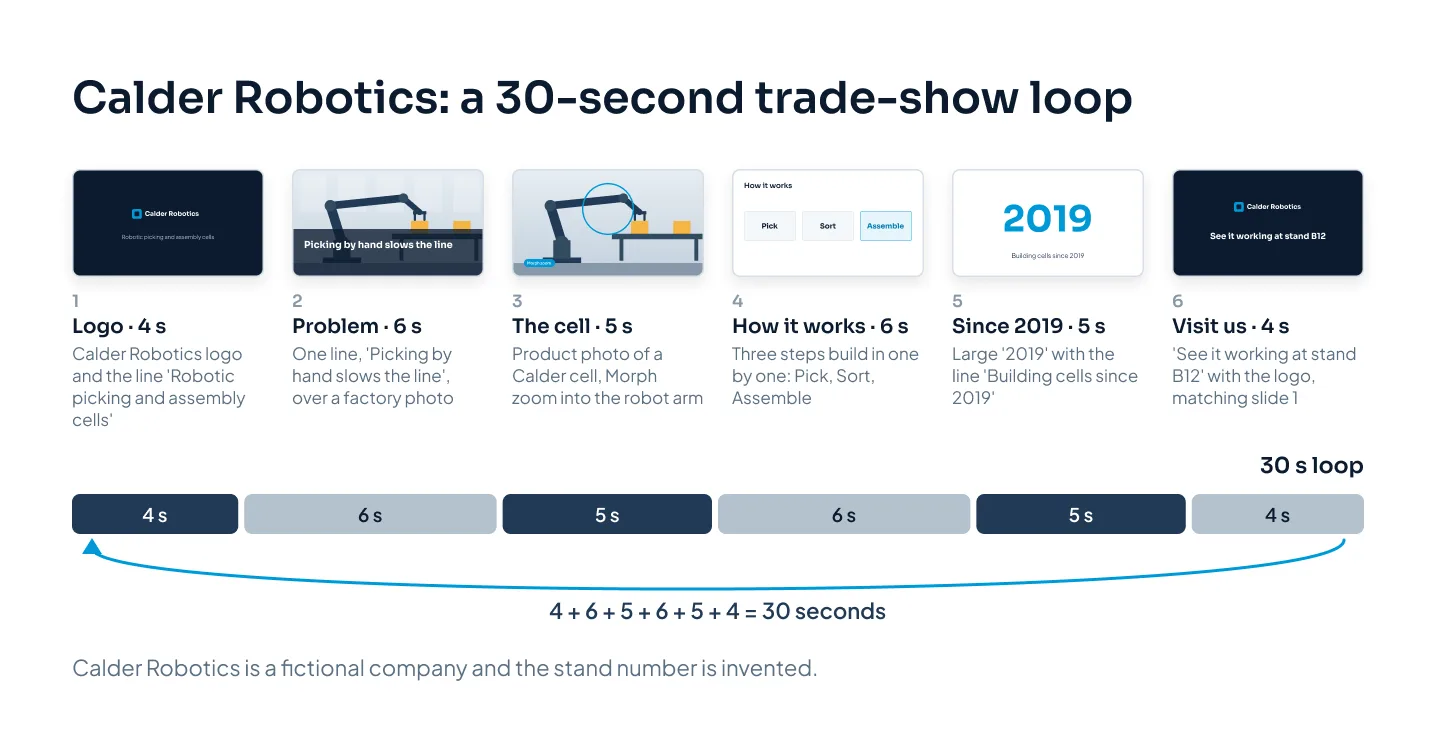
The last slide matters most in a loop. When the video restarts, it jumps from the last slide straight back to the first, so design the two to sit well together, for example by ending on the same logo and colors the loop opens with. Looping the video is set in the player or on the screen.
Narration and recording
For a walkthrough or a training video, your voice does much of the work. The Record tab in Microsoft 365 records narration, camera and ink slide by slide, and shows your notes at the top of the screen as a teleprompter while you record.
That makes the notes your script. Write them before you record, one short block per slide, in the words you'd actually say. Our guide to speaker notes covers how to write notes that are easy to read aloud.
A few habits make the recording sound better:
Record in a quiet room, with the same microphone and distance throughout, so the volume doesn't jump between slides.
Pause briefly at the start and end of each slide, so the narration doesn't feel clipped when slides change.
Leave room for the camera. If your video shows a small picture of you, keep that corner of the slide free on every layout.
Use the laser pointer to point. Its movements are included in the exported video on Windows.
When you export, choose "Use Recorded Timings and Narrations", so each slide stays up for as long as you spoke over it.
Plan captions for any narrated video. They help people who watch with the sound off and people who are deaf or hard of hearing. Add them where the video will be published, if that supports captions, or keep the key words on the slide itself. Our accessible presentations checklist covers the rest of an accessible deck.
Design for video, not for clicks
A deck designed for a presenter assumes someone is there to click, explain and slow down. A video has none of that. Design for it:
No clicks. Every build has to start automatically. Set each animation to start after the one before it, with a short delay if needed, and check the order on every slide.
Bigger text, fewer words. Videos are often watched in a small player or on a phone. Our starting point for video is titles at 40 pt or more and body text no smaller than 24 pt. If it doesn't fit, there's too much on the slide.
Nothing that needs a click to work. Links, buttons and anything that waits for a click do nothing in a video. Put a web address in plain text if people need it.
The right shape. A 16:9 slide at 1920 × 1080 matches a Full HD video exactly. If the clip is for a feed that favors square or vertical video, set the slide size before you design anything, not after.
Keep clear of the edges. Video players can lay controls and a progress bar over the bottom of the frame. Keep key text and numbers away from it.
Sturdy lines and type. Very thin lines and small text can soften once a video is compressed for sharing. Use regular or bold weights and solid shapes.
Assume no sound. A loop on a stand plays silently. Each slide should make its point without narration.
Embed, don't link. Linked video and sound files are left out of the export, so embed any media the video needs.
A video has no presenter. Every slide has to explain itself, at the speed the timing allows.
Animation that works in a video
The same rule applies as in a live deck: motion should help people understand. In a video it also has to carry the pacing, because there's no presenter to set it.
Motion earns its place when it does one of four jobs:
Builds a sequence. Steps in a process appear one at a time, in order.
Shows change. A bar grows, a number counts up, a line extends to the latest month.
Moves attention. A highlight shifts to the part of the slide that matters now.
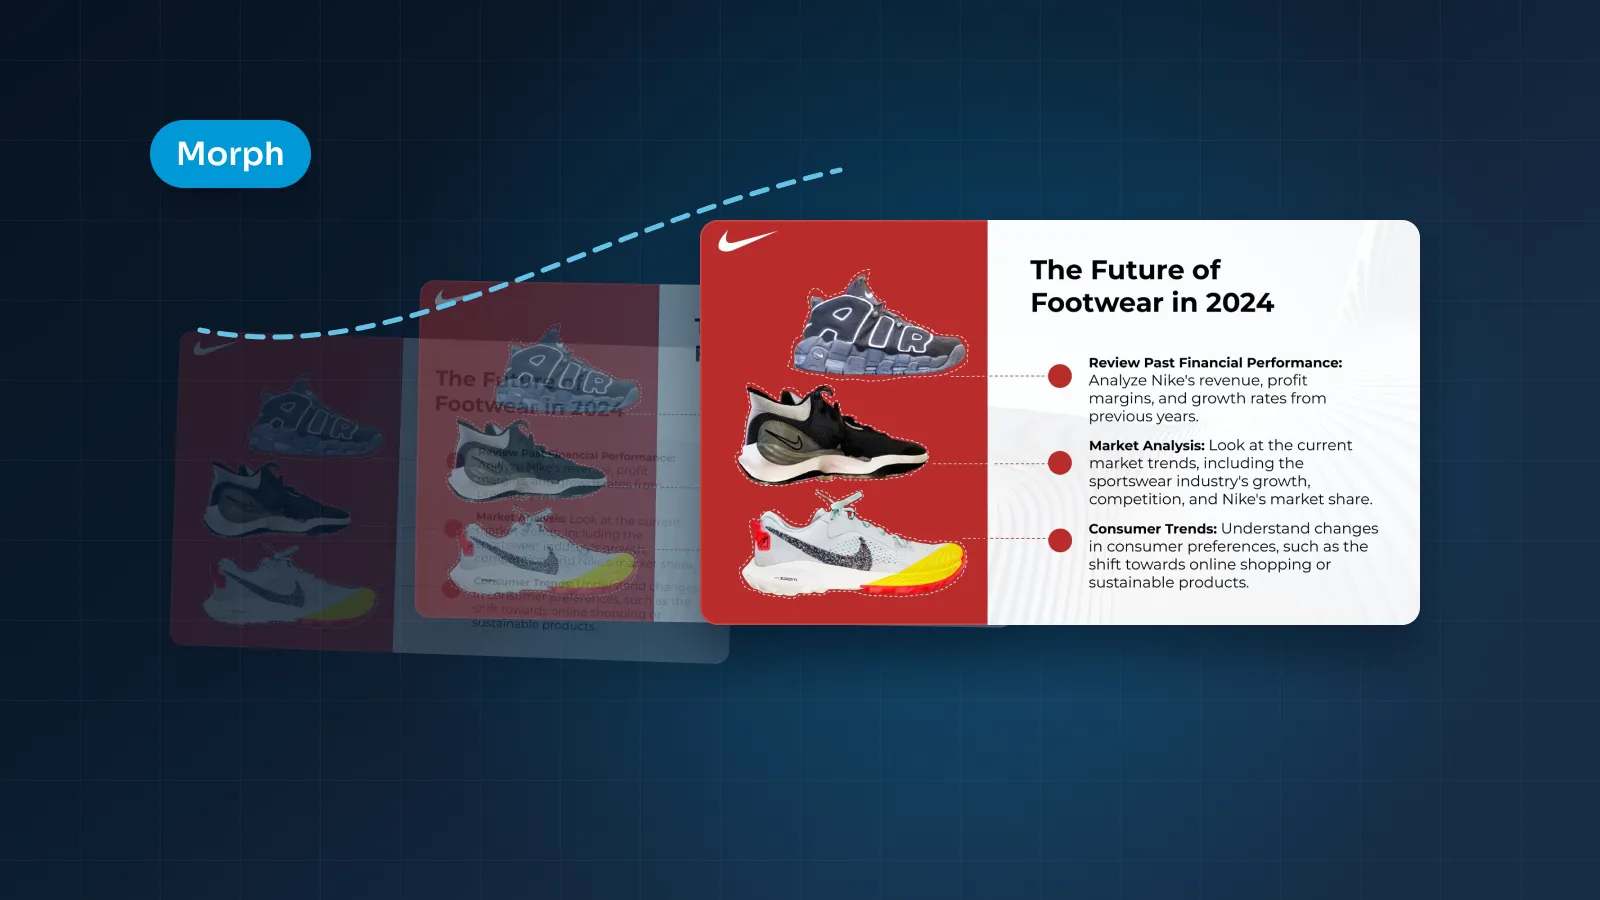
Connects two states. Morph carries an object from one slide to the next, so the viewer sees it zoom, move or turn rather than jump.
Morph needs PowerPoint 2019 or later, or Microsoft 365, and it's what makes a deck feel like a video rather than a slideshow. A product shot can glide into close-up, a map can zoom to one region, a chart can rearrange itself. Because the Mac export may not play animation effects as expected, check Morph-heavy decks in a Windows export.
Keep the motion disciplined:
Let every move finish, then hold. The viewer needs a moment of stillness to read what just arrived.
Use one or two effect types, at the same speed, moving in the same direction throughout.
Animate what matters. Entrances for the items that build the point; nothing on the logo, the footer or the background.
Skip the showy effects. Spins, bounces and flying text look busy at any size and worse in a small player.
For examples of this kind of motion, see two of our animated decks. The Shebara Resort Rooms Division vision deck, for a luxury resort, was designed and animated with resort photography and Morph motion. The Utatu Opus investment proposal is an animated proposal for a rooftop solar project in Uganda that makes a financial model easy to follow.
At Pixel Presentation, animation is an extra $3 a slide on top of design at $10 a slide, and our PowerPoint animation service takes 2–4 working days. A 10-slide loop with every slide animated comes to $130: $100 for design and $30 for animation. The pricing estimator shows your exact price.
Check it before you send it
Never send a video you haven't watched all the way through. Before it goes out:
Watch it full screen, start to finish, at the size it will play. Then watch it on a phone.
Check every animation played, in the right order, and finished before the slide changed.
Check every slide's timing. Can you read everything once, without rushing?
Listen to the narration, if there is any: even volume, nothing clipped at slide changes.
Look for missing media. Any video or sound that was linked rather than embedded won't be there.
Look at the first frame. Players and sites can show it before anyone presses play, so it should be a clean title, not a half-built slide.
On a Mac export, check the transitions and animations with extra care.
Keep the .pptx as your master. When something changes, edit the deck and export again rather than editing the video.